




| مشخصات کالا | کد کالا | محدوه اندازه گیری | محدوده سوزن فشار | قطر سر فشار |
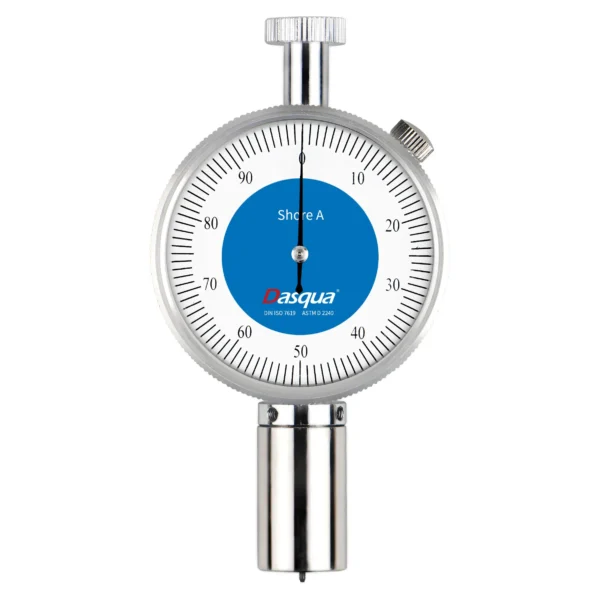
| سختي سنج پلاستيك و لاستيك و … ساعتي Shore A | 1804-1090 | 0-100HA | 2/5mm | 0/79mm |
| سختي سنج پلاستيك و لاستيك و … ساعتي Shore C | 1804-1095 | 0-100HC | 2/5mm | 2/5mm |
| سختي سنج پلاستيك و لاستيك و … ساعتي Shore D | 1804-1100 | 0-100HD | 2/5mm | 0/1mm |
طرز استفاده
1. استفاده مستقیم:
قبل از استفاده، بررسی کنید که آیا نشانگر سختیسنج در حالت آزاد به موقعیت صفر اشاره دارد یا خیر؛ اگر نشانگر به موقعیت صفر اشاره کند، میتوان اندازهگیری را آغاز کرد. در صورتی که نشانگر به موقعیت صفر اشاره نکند، پیچ قفل را شل کنید و صفحه مدرج را بچرخانید تا نشانگر به موقعیت صفر روی صفحه مدرج برسد، سپس پیچ قفل را محکم کنید.
سختیسنج را روی صفحه شیشهای قرار دهید و سوزن فشار و پد فشار را به صفحه شیشهای نزدیک کنید. در این حالت، نشانگر باید در بازه 100 ± 1 قرار گیرد. اگر نشانگر در این بازه قرار نداشت، لطفاً چندین بار به آرامی روی نشانگر فشار دهید و این عمل را تکرار کنید. اگر این روش مشکل را حل نکرد، سختیسنج قابل استفاده نخواهد بود و لطفاً با شرکت ما تماس بگیرید.
اندازهگیری: نمونهای که باید اندازهگیری شود را روی یک سطح سخت قرار دهید، پد فشار سختیسنج را روی سطح نمونه قرار داده و مقدار اندازهگیریشده را بخوانید. لطفاً مراقب باشید که دستگاه کج نباشد تا سوزن فشار به طور عمودی وارد سطح نمونه شود؛ نیروی وارد شده باید به اندازهای باشد که پد فشار بهطور کامل با سطح نمونه در تماس قرار گیرد.
2. استفاده همراه با دستگاه تست:
درپوش گرد و غبار را بردارید، سختیسنج را بهصورت خلاف عقربههای ساعت در داخل رزوههای دستگاه تست پیچ کنید و آن را محکم کنید. دکمه تنظیم جهت دستگاه تست را تنظیم کنید تا سختیسنج رو به اپراتور قرار گیرد و مشاهده و خواندن آن راحت باشد. پس از اطمینان از اینکه هیچ گونه خطایی وجود ندارد، نصب به پایان میرسد.
پس از نصب سختیسنج، دسته تنظیم فشار را به آرامی به سمت پایین بچرخانید. سختیسنج تحت تأثیر وزن گرانشی به حرکت آزاد سقوط میکند و پد فشار آن با پلتفرم تست تماس پیدا میکند. مقدار سختیسنج را مشاهده کنید. اگر مقدار مورد نظر حاصل نشد، به تنظیم ارتفاع دو دسته تنظیمی ادامه دهید تا پلتفرم تست و پد فشار سختیسنج موازی شوند. تا زمانی که مقدار سختیسنج به مقدار مورد نظر برسد، میتوان اندازهگیری را شروع کرد.
سپس دسته را آزاد کرده و اجازه دهید که نمونه به موقعیت اولیه خود برگردد. نمونه را روی پلتفرم تست قرار دهید و دسته تنظیم فشار را به آرامی به سمت پایین بچرخانید. تحت تأثیر گرانش، سختیسنج با ماده تستی تماس پیدا میکند و پس از ثابت شدن مقدار، اندازهگیری میتواند آغاز شود. دسته را آزاد کرده و اجازه دهید که سختیسنج به موقعیت اولیه خود بازگردد، سپس نمونه را روی پلتفرم تست قرار دهید. دسته تنظیم فشار را به آرامی به سمت پایین بچرخانید تا سختیسنج تحت تأثیر گرانش با ماده تستی تماس پیدا کند. هنگامی که مقدار ثابت شد، لطفاً مقدار اندازهگیریشده را بخوانید.
Usage
1. Direct use:
Before use, check whether the pointer of the durometer in the free state points to the zero position. If it points to the zero position, you can start the measurement. If it does not point to the zero position, loosen the locking screw, rotate the dial so that the pointer points to the zero position on the dial, and then tighten the locking screw.
Press the durometer on the glass plate, and bring the pressure needle and pressure foot into contact with the glass plate. At this time, the pointer should be in the range of 100 ± 1. If the pointer is not within the range of 100 ± 1, gently press the pointer several times and repeat this action. If this method does not solve the issue, the hardness tester cannot be used. Please contact our company.
Measurement: Place the sample to be measured on a hard surface, align the durometer pressure foot with the sample surface, and read the measured value. Be careful not to tilt the durometer, ensuring that the pressure needle is vertically pressed into the surface of the sample. The applied force should be just enough to make the pressure foot contact the surface of the workpiece to be measured.
2. Use with test stand:
Remove the dust cap, screw the hardness tester counterclockwise into the threads on the test stand, and fasten it in place. Adjust the orientation knob on the test stand so that the hardness tester faces the operator for easy observation and reading. After confirming that there are no errors, the installation is complete.
Once the durometer is installed, slowly turn the pressure adjustment handle downward. The durometer will move freely under the influence of gravity, and the pressure foot will contact the test platform. Observe the durometer reading. If it does not reach the desired value, continue adjusting the height using the two adjustment knobs to make the test platform and the durometer pressure foot parallel. Once the durometer reading is correct, you can begin the measurement. Release the handle to lift the sample back to its initial position.
Place the sample on the test platform, then slowly turn the pressure handle downward. Under the influence of gravity, the durometer will come into contact with the material to be tested. When the value stabilizes, you can begin the measurement. Release the handle so that the durometer returns to the initial position, place the sample back on the test platform, and slowly turn the pressure handle downward. The durometer, under the influence of gravity, will make contact with the material to be measured. Once the value stabilizes, please read the measured value.


نقد و بررسیها
پاکسازی فیلترهنوز بررسیای ثبت نشده است.